Remember that time you were cruising down the road, windows cracked just enough for that perfect breeze, only to have a sudden downpour ruin the moment? Rain splattered inside, soaking your arm and drenching your car’s interior. Or perhaps you’ve dealt with that annoying wind noise and buffeting at highway speeds when trying to get some fresh air? We’ve all been there, craving that little bit of open-air comfort without the elements crashing the party. That’s where side window deflectors come in handy, but who wants to break the bank for a simple accessory?
Finding the right balance between quality and affordability can be tricky. That’s why we’ve done the legwork for you! We’ve compiled a comprehensive guide to help you discover the best side window deflectors under $100. Get ready to explore top-rated options, learn about key features to consider, and find the perfect set to enhance your driving experience without emptying your wallet. We’ll help you stay dry, reduce wind noise, and enjoy fresh air, all while keeping your budget in check.
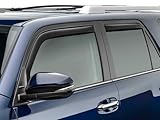
Before moving into the review of the best side window deflectors under $100, let’s check out some of the relevant products from Amazon:


Last update on 2026-01-30 / #ad / Affiliate links / Images from Amazon Product Advertising API
What’s the Big Deal with Window Deflectors Anyway?
Ever been cruising down the road on a beautiful day, wanting that fresh air feeling, but instantly regretting it as a gust of wind tries to rip your hair out? Or worse, a sudden rain shower threatens to soak your interior? Yeah, we’ve all been there! That’s where side window deflectors come in – those handy little attachments that stick above your car windows. They’re designed to redirect wind and rain, letting you crack your windows open without turning your car into a wind tunnel or a miniature swimming pool.
Think of them as tiny, aerodynamic superheroes protecting you from the elements. Beyond weather protection, they also help reduce wind noise, which is a blessing on long road trips. Plus, they can even minimize fogging by allowing for a little ventilation. With the average American spending over 17,600 minutes driving each year (according to AAA data), a little extra comfort can go a long way!
Now, you might be thinking, “Sounds fancy! Probably expensive, right?” Not necessarily. There are plenty of high-quality options that won’t break the bank. In fact, we’re diving into the world of the best side window deflectors under $100, proving that you can enhance your driving experience without emptying your wallet.
So, whether you’re a seasoned road-tripper, a daily commuter, or just someone who appreciates a little fresh air without the fuss, stick around. We’ll explore the top contenders and help you find the perfect set of deflectors to suit your needs and budget. Ready to say goodbye to windblown hair and surprise rain showers? Let’s get started finding the best side window deflectors under $100 for you!
5 Best Side Window Deflectors Under $100
Auto Ventshade (AVS) Ventvisor Deflector
The AVS Ventvisor is a classic for a reason! These deflectors are known for their easy installation, usually involving adhesive tape. The smoke finish looks sleek and blends well with most vehicles, providing a subtle yet noticeable upgrade. They effectively reduce wind noise and allow you to crack the window open slightly, even in light rain, without getting soaked. Plus, they help keep your car cooler by letting hot air escape when parked.
However, some users have noted that the adhesive can sometimes fail over time, particularly in extreme weather conditions. While the smoke finish is generally liked, some might find it too dark and wish for a lighter tint option. Overall, for the price and ease of use, the AVS Ventvisor remains a solid choice for those looking for basic, reliable window deflectors.
WeatherTech Side Window Deflectors
WeatherTech has built a reputation for quality car accessories, and their side window deflectors are no exception. These are typically in-channel designs, meaning they fit snugly inside the window channel without the need for exterior tape. This gives them a cleaner, more integrated look and eliminates the risk of adhesive failure. The tinted acrylic material is durable and resists cracking or fading, promising long-lasting performance.
The downside is that in-channel deflectors can sometimes interfere with the auto-up function of your windows, requiring a bit of “training” for the system to adapt. They may also be slightly more expensive than tape-on options. Still, many believe the premium fit and finish of WeatherTech deflectors are well worth the extra investment.
EGR In-Channel Window Deflectors
EGR In-Channel Window Deflectors offer a sleek and subtle way to improve your driving experience. Their in-channel design means no exterior tape, providing a clean and factory-installed appearance. Made from durable acrylic, these deflectors are built to withstand the elements, reducing wind noise and allowing fresh air circulation even during light rain. They are designed for a precise fit, ensuring a seamless integration with your vehicle.
Although the in-channel design provides a clean look, some users have reported initial difficulty during installation and potential issues with window operation until the deflectors settle. While the EGR deflectors offer a quality product, it is vital to make sure they fit properly on your vehicle to ensure there are no issues with window functionality. Overall, EGR window deflectors are a solid choice for those seeking an attractive and functional upgrade.
Stampede Vigilante Premium Side Window Deflectors
If you’re looking for a bold and rugged aesthetic, the Stampede Vigilante deflectors might be right up your alley. These are often tape-on designs with a wider profile and a more pronounced lip, offering maximum protection from the elements. They’re often available in unique finishes like textured black, which can complement off-road vehicles or those with a more aggressive style.
While the robust design provides excellent wind and rain deflection, it might not appeal to everyone. The wider profile can be quite noticeable and may slightly obstruct the driver’s view. As tape-on deflectors, the quality of the adhesive is crucial, so proper preparation and installation are key for long-term adhesion. Overall, the Stampede Vigilante is a great option for those who prioritize function and a distinctive look.
WellVisors Side Window Visors Deflectors
WellVisors are another popular choice when looking for stylish and practical window deflectors. Their sleek designs often mimic factory styles, providing a subtle yet noticeable improvement to your vehicle’s appearance. Installation is generally straightforward, utilizing adhesive tape, and the acrylic material is resistant to fading and cracking. They effectively reduce wind noise and let you enjoy fresh air even during a drizzle.
Some users have reported that the adhesive, while strong, can be challenging to remove without residue if you decide to take the deflectors off later. While they offer a good balance between style and functionality, their wind noise reduction may not be as significant as some of the bulkier options. All in all, WellVisors offer a well-rounded option for those who prioritize a blend of form and function.
Why You Need Side Window Deflectors (Under $100!)
Ever been caught in a sudden downpour while driving and had to quickly roll up your window, trapping the humid air inside and fogging everything up? Or maybe you’re a smoker who enjoys a puff on your commute but hates the lingering smell clinging to your car’s interior? That’s where the best side window deflectors under $100 come to the rescue! These simple, affordable accessories provide a subtle but impactful upgrade to your driving experience.
Imagine this: you’re cruising down the highway on a beautiful, sunny day. You want a breath of fresh air, but the wind buffeting against your face is deafening and messes up your hair. Side window deflectors allow you to crack your windows open slightly, letting in a gentle breeze without the annoying wind noise or turbulence. They also act as a shield against rain, preventing water from dripping inside your car while still allowing for ventilation. No more soggy seats or struggling to see through a fogged-up windshield!
Beyond comfort, side window deflectors offer a practical benefit – enhanced security. Leaving your windows slightly ajar on a hot day can make your car an easy target for theft. With deflectors installed, you can keep your windows cracked open for ventilation without making it obvious, deterring potential criminals. Plus, they add a sleek, custom look to your vehicle, enhancing its overall aesthetic appeal.
Investing in a set of the best side window deflectors under $100 is a small price to pay for increased comfort, enhanced safety, and a touch of personalization for your ride. Whether you’re battling rain, wind, or stuffy air, these inexpensive accessories offer a simple solution with a big impact. Say goodbye to foggy windows, messy hair, and stale air, and hello to a more enjoyable and comfortable driving experience!
Installation Tips and Tricks for Under $100 Deflectors
So, you’ve picked out your awesome, budget-friendly side window deflectors, and they’ve arrived on your doorstep. Now comes the fun part: putting them on! While most deflectors under $100 are designed for easy, tool-free installation, a few clever tricks can make the process even smoother and ensure a long-lasting, secure fit. Think of it like prepping for a paint job; a little prep work goes a long way.
First, cleaning the area around your window frame is crucial. Use a good degreasing cleaner to remove any dirt, wax, or old adhesive residue. Imagine trying to stick a bandage to a dirty arm – it just won’t hold well! Similarly, a clean surface ensures the adhesive on your deflectors bonds properly to your vehicle.
Next, consider the weather. Installing deflectors on a cold day can prevent the adhesive from sticking effectively. A little warmth helps. If it’s chilly, use a hairdryer to gently warm the area around the window frame before applying the deflectors. Just be careful not to overheat the plastic!
Finally, patience is your friend. Don’t rush the process. Once you’ve positioned the deflector correctly, apply firm, even pressure along the entire length of the adhesive strip. Hold it in place for a minute or two, allowing the adhesive to grab hold. Resist the urge to immediately roll down the window. Give the adhesive at least 24 hours to fully cure before testing them out in the rain.
Maintaining Your Budget-Friendly Deflectors
You’ve invested in side window deflectors to enhance your driving experience, but like any automotive accessory, they require some maintenance to keep them looking and functioning their best. Think of it like taking care of a good pair of shoes – regular cleaning and care will extend their lifespan and keep them performing as intended.
Regular washing is the simplest yet most effective way to maintain your deflectors. When you wash your car, give the deflectors a good scrub with soap and water. This removes dirt, grime, and bug splatters that can dull their appearance and potentially damage the plastic over time. Imagine leaving sunscreen caked on your skin all summer; it’s not going to do it any favors.
Avoid using harsh chemicals or abrasive cleaners on your deflectors. These can scratch the surface or damage the protective coating, leaving them looking cloudy and worn. Stick to mild soap and water or a specialized plastic cleaner. Think of it like cleaning delicate jewelry – you wouldn’t use a harsh scouring pad, would you?
Periodically inspect your deflectors for any signs of damage, such as cracks, chips, or loose adhesive. Addressing these issues early can prevent them from becoming more serious and potentially requiring replacement. A small crack can quickly spread if left unattended, especially in extreme weather conditions.
Finally, consider applying a plastic protectant every few months. This helps to restore shine, protect against UV damage, and prevent fading. It’s like applying sunscreen to your deflectors, shielding them from the harsh rays of the sun and keeping them looking new for longer.
Troubleshooting Common Deflector Issues
Even the best side window deflectors can sometimes encounter problems. Understanding common issues and how to address them can save you time, money, and frustration. Think of it like knowing basic first aid – you’re prepared for minor emergencies and can handle them effectively.
One common issue is wind noise. If you notice excessive wind noise after installing your deflectors, it could be due to improper installation or a poor seal. Double-check that the deflectors are securely attached and that the adhesive is making full contact with the window frame. Imagine a slightly open window on a windy day – that’s the kind of noise you might be hearing if the deflector isn’t properly sealed.
Another common problem is the deflector falling off. This is often caused by inadequate surface preparation or using deflectors with weak adhesive. Before reinstalling, thoroughly clean the area and consider using a stronger adhesive specifically designed for automotive plastics. Think of it like trying to hang a heavy picture with flimsy tape – it’s bound to fall eventually.
Sometimes, deflectors can interfere with the automatic window function. This can happen if the deflector is too thick or improperly positioned. Try adjusting the position of the deflector slightly or trimming the edge with a sharp knife if necessary. Always be careful not to damage the deflector or your vehicle.
Finally, discoloration or fading can occur over time due to exposure to sunlight. While this is a natural process, using a plastic protectant can help to minimize fading and keep your deflectors looking their best. Think of it like protecting your car’s paint from the sun’s harmful rays.
Comparing Different Types of Deflectors (Tape-on vs. In-Channel)
When shopping for side window deflectors, you’ll primarily encounter two types: tape-on and in-channel. Each has its own advantages and disadvantages, and understanding the differences can help you choose the best option for your needs and vehicle. Think of it like choosing between a hammer and a screwdriver – both are useful tools, but they’re designed for different purposes.
Tape-on deflectors are attached to the outside of your window frame using adhesive tape. They’re typically easier to install and often less expensive. Imagine sticking a decorative border around a picture frame – that’s essentially how tape-on deflectors work. They’re a good choice if you prioritize ease of installation and affordability.
In-channel deflectors, on the other hand, are inserted directly into the window channel. This provides a more streamlined appearance and can sometimes offer better protection against wind noise. Think of it like sliding a document into a plastic sleeve – it’s a cleaner, more integrated look. However, in-channel deflectors can sometimes interfere with the window’s automatic closing function.
The installation process also differs significantly. Tape-on deflectors require careful cleaning and surface preparation to ensure proper adhesion, while in-channel deflectors require careful positioning and may require some slight adjustments to the window’s automatic closing mechanism. If you are not comfortable with a little more fineness, tape-on may be a better fit.
Ultimately, the best type of deflector depends on your personal preferences, budget, and the specific make and model of your vehicle. Consider the pros and cons of each type and read reviews from other users to make an informed decision. It is an accessory that enhances your ride, so find the best fit for your taste and use.
Best Side Window Deflectors Under $100: A Buying Guide
Hey there, friend! Thinking about getting some side window deflectors? Smart move! They can really make a difference in your driving experience, letting you crack open your windows for fresh air even when it’s raining or the sun is blazing. But with so many options out there, especially when you’re trying to stick to a budget, it can be tough to know where to start. Don’t worry, I’ve got you covered! This guide will walk you through everything you need to consider to find the best side window deflectors under $100 for your ride. Let’s dive in!
Vehicle Compatibility: Making Sure They Actually Fit!
This is the absolute first thing you need to nail down. There’s nothing more frustrating than ordering a set of deflectors, eagerly waiting for them to arrive, and then discovering they’re completely the wrong size or shape for your car. Side window deflectors are specifically designed for particular makes and models. So, before you even start browsing, know your vehicle’s year, make, and model inside and out. Double-check your owner’s manual or a reliable online resource if you’re unsure.
Once you have that info, meticulously compare it against the product descriptions of the deflectors you’re considering. Most reputable sellers will clearly state which vehicles their deflectors are compatible with. Look for exact matches. Even slight variations in sub-models can sometimes affect the fit. Don’t assume they’ll “probably” fit; confirm it. Many online retailers have vehicle selector tools – use them! It’s a quick way to filter out incompatible options and focus on the ones that are actually worth your time. Remember, a perfect fit is crucial for both functionality and aesthetics.
Material Quality and Durability: How Long Will They Last?
Let’s be real, for the best side window deflectors under $100, you’re not expecting space-age materials. However, that doesn’t mean you should settle for flimsy, brittle plastic. Look for deflectors made from acrylic or polycarbonate. These materials are generally weather-resistant, impact-resistant, and offer decent UV protection. The last thing you want is your deflectors cracking or fading after just a few months in the sun.
Read customer reviews carefully. See what other drivers are saying about the material quality. Do they mention any issues with cracking, warping, or discoloration? Pay attention to the thickness of the deflectors too. Thicker material generally equates to greater durability. While it might be tempting to go for the absolute cheapest option, investing a little extra in a higher-quality material can save you money in the long run by preventing premature replacement.
Installation Method: Stick-On or In-Channel?
There are two main types of installation: stick-on (also called “tape-on”) and in-channel. Stick-on deflectors attach to the outside of your window frame using adhesive tape. In-channel deflectors, on the other hand, slide directly into the window channel. Each type has its pros and cons. Stick-on deflectors are typically easier to install, requiring minimal tools and technical expertise. However, some people find them less aesthetically pleasing since they’re visibly attached to the exterior of the vehicle. Plus, the adhesive can sometimes fail over time, especially in extreme weather conditions.
In-channel deflectors offer a cleaner, more integrated look. They sit flush with the window frame, giving a more factory-installed appearance. However, installation can be a bit trickier, sometimes requiring you to bend or manipulate the deflectors to get them to fit properly. There’s also a slight risk of damaging your window regulator if you’re not careful. Consider your comfort level with DIY projects and your tolerance for potential installation challenges when making your decision. For the best side window deflectors under $100, many find the in-channel type to be a more premium experience, even if the installation has a small learning curve.
Aesthetics and Design: Making Your Car Look Good!
Let’s face it, you want your side window deflectors to look good on your car! They should complement your vehicle’s overall style and enhance its appearance, not detract from it. Consider the shape, color, and finish of the deflectors. Do they have a sleek, aerodynamic design or a more boxy, utilitarian look? Do they come in a smoke finish, a clear finish, or some other color option? Think about what will best match your car’s paint job and existing accessories.
Pay attention to the profile of the deflectors as well. Some are low-profile and barely noticeable, while others are more prominent and visually striking. Look at pictures of the deflectors installed on vehicles similar to yours to get a better sense of how they’ll look in real life. Read customer reviews regarding appearance. Do people think they look cheap, or do they seamlessly blend with the vehicle’s design? It’s all about finding a balance between functionality and aesthetics.
Noise Reduction: Minimizing Wind Buffeting
One of the main benefits of side window deflectors is their ability to reduce wind noise when your windows are slightly open. This is especially important if you frequently drive on the highway or live in a windy area. Look for deflectors that are designed with a curved or angled profile to effectively deflect the wind away from your windows. Some manufacturers even incorporate special features, such as integrated air diffusers, to further minimize wind buffeting.
Read customer reviews specifically regarding noise levels. Do people notice a significant reduction in wind noise after installing the deflectors? Do they mention any whistling or other unusual sounds? Be aware that even the best side window deflectors under $100 won’t completely eliminate wind noise, but they should definitely make a noticeable improvement. If you’re particularly sensitive to noise, consider investing in a higher-end set with advanced noise-reduction features, even if it means stretching your budget a little.
Customer Reviews and Ratings: What Are Others Saying?
Before you commit to buying any side window deflectors, take the time to read customer reviews and ratings. This is one of the best ways to get an honest, unbiased assessment of a product’s quality, performance, and ease of installation. Pay attention to both the positive and negative reviews. Look for recurring themes or patterns. Are there multiple complaints about the adhesive failing, the deflectors cracking, or the fit being incorrect?
Don’t just focus on the overall star rating. Dig deeper and read the individual reviews to get a more nuanced understanding of the product’s strengths and weaknesses. Pay close attention to reviews from customers who own the same vehicle as you, as their experiences will be the most relevant to your situation. Also, be wary of fake or incentivized reviews. Look for reviews that are detailed, specific, and sound genuine. Remember, customer reviews are a valuable source of information that can help you make an informed decision.
Price and Warranty: Getting the Most for Your Money
You’re looking for the best side window deflectors under $100, so price is definitely a factor. But don’t just automatically go for the cheapest option. Consider the overall value you’re getting for your money. A slightly more expensive set of deflectors that are made from higher-quality materials, offer better noise reduction, and come with a longer warranty might actually be a better deal in the long run.
Speaking of warranty, be sure to check the warranty terms and conditions before you buy. A reputable manufacturer will typically offer a limited warranty against defects in materials and workmanship. This can give you peace of mind knowing that you’re protected if something goes wrong. Read the fine print carefully to understand what’s covered and what’s not. And don’t forget to factor in the cost of shipping and handling when calculating the total price. Comparing prices from different retailers can help you find the best deal. Don’t be afraid to shop around and look for sales or discounts.
Frequently Asked Questions
What are side window deflectors and why should I get them?
Side window deflectors, also known as rain guards or vent visors, are little shields that attach to the top of your car’s windows, usually along the frame. They allow you to crack your windows open just a bit, even when it’s raining, snowing, or super sunny outside! This keeps fresh air circulating in your car without letting the elements rush in.
Think of it like this: stuffy car air out, fresh air in, all while keeping the rain and sun off your seats. They can help reduce wind noise and sun glare too, making your drive much more comfortable. Plus, many people think they add a sleek, customized look to their vehicle.
How do I install side window deflectors? Is it difficult?
Don’t worry, installing side window deflectors is usually pretty straightforward! Most sets come with either adhesive tape or clip-on attachments (or sometimes both!). The adhesive tape ones are really common – you just clean the area around your window frame, peel off the backing on the tape, and carefully stick the deflector in place. Clip-on ones simply slide into the window channel.
Either way, always read the instructions included with your specific deflectors. They’ll give you the best guidance for your particular model. Usually, installation is a quick DIY project that takes under an hour, and you don’t need any special tools. But if you’re not confident, a local mechanic could easily handle it for a reasonable fee.
What should I look for when buying side window deflectors for my car?
First and foremost, make sure the deflectors are made specifically for your car’s make, model, and year. A universal fit won’t cut it! Proper fitment is key for both effectiveness and aesthetics. Also, think about the material – durable acrylic or polycarbonate plastics are your best bet because they can handle the elements and last longer.
Next, consider the style you prefer. In-channel deflectors install inside the window channel for a seamless look, while the tape-on ones attach to the outside. It’s really a matter of personal preference! Finally, check customer reviews. Seeing what other drivers have to say about the deflectors’ fit, quality, and durability can give you a really good idea of what to expect.
Will side window deflectors affect my car’s windows or window motors?
When installed correctly, side window deflectors shouldn’t negatively impact your windows or their motors. The key is proper installation! If you’re using in-channel deflectors, make sure they’re not too tight and aren’t putting excessive pressure on the glass.
Sometimes, especially with in-channel deflectors, the auto-up feature on your windows might act a little wonky at first. Don’t panic! This usually resolves itself after a few window cycles as the deflector settles into place. If the problem persists, you might need to adjust the deflector slightly or consider a tape-on style instead.
Are more expensive side window deflectors really better?
Not necessarily! While pricier deflectors might use slightly higher-grade materials or offer a more precise fit, you can definitely find excellent options for under $100. It’s all about doing your research and reading those reviews!
Instead of focusing solely on price, pay attention to things like the material’s UV resistance (to prevent fading), the strength of the adhesive (if applicable), and the overall design. Sometimes, a well-reviewed, mid-range option will perform just as well as, or even better than, a more expensive brand.
How do I clean my side window deflectors?
Cleaning your side window deflectors is pretty easy! You can use the same car wash soap and water you use on the rest of your vehicle. A soft sponge or microfiber cloth is perfect for wiping them down without scratching the surface.
Avoid using harsh chemicals or abrasive cleaners, as these can damage the finish and potentially cloud the plastic. Once you’ve washed them, simply rinse them thoroughly with water and dry them with a clean, soft towel. Regular cleaning will help keep them looking their best and ensure they stay clear for optimal visibility.
Can I remove side window deflectors if I don’t like them?
Yes, you can! Removing tape-on deflectors will require a little patience. Start by gently heating the adhesive with a hair dryer to soften it. Then, carefully peel the deflector away from the car’s surface. A plastic scraper or putty knife can help, but be gentle to avoid scratching the paint.
Once the deflector is removed, you’ll likely have some adhesive residue left behind. You can remove this using a product specifically designed for adhesive removal, like Goo Gone or WD-40. Always test the cleaner in an inconspicuous area first to make sure it doesn’t damage your car’s paint. In-channel deflectors are much easier to remove – just carefully slide them out of the window channel.
Final Thoughts
So, there you have it! Finding the best side window deflectors under $100 doesn’t have to be a headache. We’ve laid out some fantastic options, highlighting their strengths and features to help you choose the perfect fit for your ride and your budget. Remember, enhancing your driving experience is about more than just aesthetics; it’s about comfort, safety, and enjoying the open road (even when the weather isn’t cooperating). Take a look at your short list and consider which set ticks all the right boxes for you.
Now, go forth and conquer those rainy days and breezy drives! You’ve got the knowledge, you’ve seen the options, and you’re ready to make a smart, confident decision. Upgrade your vehicle, embrace the fresh air, and hit the road with your brand new side window deflectors. Adventure awaits!