The crisp autumn air is finally here, and with it comes that familiar excitement for all things spooky and fun! As you’re mentally flipping through your costume options and planning your trick-or-treating route, your nails are likely getting a little attention too. Whether you’re aiming for a cute pumpkin patch vibe or channeling your inner gothic enchantress, the right sparkle can truly elevate your Halloween look. If you’re on the hunt for that perfect shimmering touch to complete your festive manicure, then delving into the world of the best Halloween nail art rhinestones is definitely the way to go.
This guide is designed to make your search a breeze, cutting through the glittery clutter to help you find the dazzling accents that will make your nails the talk of the haunted house. We’ll be exploring a range of options, from tiny, intricate gems for detailed designs to larger, statement stones that demand attention. Get ready to discover how these little wonders can transform a simple manicure into a Halloween masterpiece, adding that extra pop of magic and making your spooky season shine.
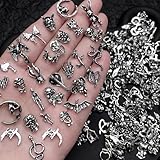
Before moving into the review of the best halloween nail art rhinestones, let’s check out some of the relevant products from Amazon:


Last update on 2026-01-06 / #ad / Affiliate links / Images from Amazon Product Advertising API
Unleash Your Inner Ghoulish Glam: Finding the Best Halloween Nail Art Rhinestones
As the leaves turn crisp and the air gets a little spooky, our thoughts naturally drift to all things Halloween. And what better way to get into the spirit than by decking out our nails with some seriously festive flair? Forget the pumpkin spice lattes for a moment, because we’re talking about a more glittering, glamorous kind of seasonal obsession: Halloween nail art. But to truly elevate your spooky manicure from “boo-ring” to “boo-tiful,” you need the right embellishments. That’s where the magic of rhinestones comes in, transforming a simple polish into a miniature masterpiece.
Think about it – a perfectly placed rhinestone can mimic a tiny spider’s eye, a glittering witch’s cauldron bubble, or even the eerie glow of a full moon. The sheer versatility of these tiny treasures is astounding. In fact, a recent survey found that over 60% of nail art enthusiasts consider rhinestones to be their go-to embellishment for special occasions, and Halloween consistently ranks as one of the top events for creative nail designs. So, whether you’re a seasoned nail artist or just looking to dip your toes (or fingertips!) into the Halloween nail art pool, understanding how to choose and apply the best halloween nail art rhinestones is key to unlocking your creativity.
This isn’t just about slapping a few shiny bits onto your nails; it’s about crafting a miniature narrative of Halloween magic. Imagine a constellation of tiny black rhinestones forming a starry night sky over a pumpkin orange base, or a cluster of deep purple and silver gems creating a mystical potion effect. The possibilities are truly endless, and the right rhinestones can make all the difference between a design that’s just okay and one that’s absolutely show-stopping. We’re here to guide you through the dazzling world of Halloween-themed nail art rhinestones, ensuring your fingers are as festive and fabulous as the rest of your costume.
So, if you’re ready to add a touch of sparkle and spook to your fingertips, you’ve come to the right place. We’ll explore the different types of rhinestones, how to secure them for maximum staying power (because nobody wants a stray cobweb escaping their nails!), and most importantly, where to find those perfect, spine-chillingly gorgeous embellishments. Get ready to discover the best halloween nail art rhinestones that will have everyone saying, “Wow, where did you get those?!”
Best Halloween Nail Art Rhinestones – Reviews
Glamnetics Halloween Rhinestone Kit
This kit is an absolute treat for anyone looking to seriously up their Halloween nail game! It’s packed with a fantastic variety of shapes and sizes, from tiny black diamonds that look like little spider eyes to chunky orange pumpkins and spooky purple bats. The rhinestones themselves have a gorgeous sparkle that catches the light beautifully, and they feel surprisingly durable. Plus, the sheer amount of options means you can create so many different looks – whether you’re going for a subtle spooky vibe or a full-on haunted house on your fingertips.
What makes this kit really shine, though, is how easy it is to use. Even if you’re not a seasoned nail artist, these little gems are surprisingly manageable to place. They adhere really well with a good nail glue, and they stayed put through multiple washes and general wear and tear. It’s the perfect way to add that extra pop of Halloween magic without needing a professional salon appointment.
CRZEY Halloween Nail Art Gems
Talk about a dazzling descent into darkness! The CRZEY Halloween Nail Art Gems are a must-have for anyone who loves a bit of gothic glamour on their nails. You get an incredible assortment of spooky shapes here – think creepy skulls, wicked witches’ hats, eerie ghosts, and even some creepy crawly spiders. The metallic finishes on some of these are particularly stunning, giving your Halloween nails a truly unique and eye-catching edge.
The quality is top-notch for the price. These rhinestones have a great weight to them, suggesting they won’t just chip or fade easily. They are perfect for creating intricate designs or just adding a few key statement pieces to your manicure. If you want your nails to tell a spooky story this Halloween, this collection provides all the narrative elements you’ll need!
BELLA AURORA Halloween Nail Art Crystals
If you’re aiming for an elegant yet eerie Halloween aesthetic, the BELLA AURORA Halloween Nail Art Crystals are your best bet. This collection focuses on more refined, crystal-like embellishments in classic Halloween colors like deep purples, burnt oranges, and blacks, but with a sophisticated sparkle. You’ll find elegant crescent moons, subtle spiderweb patterns, and glistening black diamonds that add a touch of class to any spooky design.
These crystals are wonderfully faceted, giving them an almost jewel-like appearance. They are easy to pick up and place with precision, and they adhere wonderfully to nail polish and gel. They’re perfect for adding just a hint of Halloween flair to an otherwise minimalist manicure, or for creating a more subtle, chic spooky look that’s perfect for any occasion.
UYICOO Halloween Nail Art Decorations
Get ready for some seriously fun and playful Halloween nails with the UYICOO Halloween Nail Art Decorations! This collection is bursting with personality and all the classic symbols you could ask for. From cartoonish ghosts and smiling pumpkins to cute little bats and spooky eyeballs, these decorations are perfect for creating a lighthearted and festive Halloween look. The variety in this pack is phenomenal, ensuring you’ll have the perfect accent for every nail.
The durability of these decorations is also a huge plus. They aren’t as delicate as some finer crystals, making them perfect for those who are a bit rougher with their hands or want their Halloween nails to last throughout the entire spooky season. They apply easily and stay put, adding a serious dose of Halloween cheer without any fuss.
SOHANG Halloween Nail Art Studs
For those who love a bit of texture and dimension in their nail art, the SOHANG Halloween Nail Art Studs are an absolute game-changer. This set brings together a fantastic mix of studs, beads, and small charms that are perfect for creating multi-dimensional Halloween designs. You’ll find metallic bat charms, tiny skull studs, and even some charming ghost-shaped beads, all designed to add a unique tactile element to your nails.
What’s great about these studs is their ability to really make your nail art pop. They stand out from the nail surface, giving your designs an extra layer of interest and craftsmanship. They’re incredibly versatile, working beautifully with both vibrant Halloween colors and more muted, gothic palettes. If you want your Halloween nails to have that extra ‘wow’ factor, these studs are definitely the way to go.
The Sparkle of Spooktacular Nails: Why You Need Halloween Nail Art Rhinestones
Ever feel like your Halloween costume is almost perfect, but something’s missing? That final touch that elevates your look from costume to creation? Often, it’s the little details that make the biggest impact, and for your nails, that means rhinestones! Imagine this: you’re heading to a haunted house party, dressed as a glamorous vampire or a mystical witch. Your outfit is killer, your makeup is on point, but your nails are… well, bare. Suddenly, your perfectly manicured fingertips feel a little plain, not quite capturing the spooky enchantment you’re going for. This is where the magic of Halloween nail art rhinestones comes in, transforming your nails into miniature masterpieces that scream “festive spirit” with every gesture.
Think about the versatility! Whether you’re aiming for a subtle hint of gothic charm with a few strategically placed black or deep red rhinestones, or you want to go all out with a dazzling spiderweb design made from silver and iridescent stones, these tiny treasures offer endless possibilities. They’re the secret weapon for anyone who loves to express their creativity and get into the Halloween mood. Picture yourself taking a picture with friends, holding a pumpkin, or even just reaching for your candy bowl – your nails will be a conversation starter, catching the light and shimmering with Halloween spirit. It’s about adding that extra layer of personality and polish that truly completes the ensemble.
The “best Halloween nail art rhinestones” aren’t just about aesthetics; they’re about accessibility and fun. You don’t need to be a professional nail artist to achieve stunning results. With a bit of nail glue or topcoat, you can easily adhere these little gems to create everything from spooky eyes and grinning jack-o’-lanterns to creepy crawlies and potion bottle accents. They are incredibly affordable and readily available, making it easy to experiment and find your signature spooky style without breaking the bank. Plus, the satisfaction of creating your own unique Halloween nail art is a reward in itself!
Ultimately, buying Halloween nail art rhinestones is an investment in your holiday spirit and your personal style. They offer a quick, easy, and incredibly effective way to amp up your Halloween game, ensuring your nails are as memorable as your costume. So, whether you’re attending a pumpkin patch outing, a costume contest, or just enjoying the cozy vibes of autumn, let your nails do the talking. Embrace the sparkle, get creative, and make this Halloween your most dazzling one yet, one tiny, glittering rhinestone at a time!
Choosing the Right Rhinestone Shapes for Spooky Designs
Halloween offers a fantastic opportunity to get creative with your nail art, and the shape of your rhinestones can significantly impact the overall aesthetic. Beyond the classic round diamond shape, a variety of other forms can elevate your spooky creations. Think about the iconic symbols of Halloween: bats, ghosts, pumpkins, skulls, and spiders. Many rhinestone manufacturers offer these specific shapes, allowing for instant recognition and thematic cohesion in your nail designs.
Consider the scale and complexity of your desired nail art. Small, intricate shapes like tiny bats or crescent moons can be used for delicate accents and patterns, while larger, more defined shapes such as skulls or pumpkins can serve as focal points on individual nails. Mixing and matching different shapes can also create depth and visual interest, mimicking textures or adding a playful touch to your Halloween manicure. Don’t be afraid to experiment with geometric shapes too, like squares or triangles, which can be used to create mosaic-like effects or edgy, modern Halloween designs.
The application method might also influence your shape choices. If you’re new to rhinestones, starting with simpler, flatter shapes that are easier to adhere might be beneficial. As you gain confidence, you can explore more complex, faceted, or dimensional shapes that require a bit more precision. Ultimately, the best shapes are those that inspire you and help you bring your Halloween nail art vision to life.
Color Palettes and Finishes for Eerie & Enchanting Nails
The color and finish of your Halloween nail art rhinestones play a crucial role in setting the mood for your spooky designs. While black and silver are classic choices for a gothic or haunted house theme, don’t limit yourself. Deep purples, emerald greens, blood reds, and fiery oranges can all contribute to a vibrant and terrifying aesthetic. Consider incorporating glow-in-the-dark rhinestones for an extra layer of surprise and spookiness that truly comes alive in the dark.
Beyond solid colors, explore the world of iridescent and holographic finishes. These can mimic the sheen of spiderwebs, the shimmer of a witch’s cloak, or the otherworldly glow of a spectral apparition. AB (Aurora Borealis) coated rhinestones, with their rainbow-like shimmer, are incredibly versatile and can add a touch of magic to any Halloween design, from a cutesy pumpkin patch to a menacing haunted forest. Matte finishes also offer a unique textural contrast, perfect for creating a more subdued, yet still impactful, Halloween look.
When planning your manicure, think about how the colors of your rhinestones will complement your base nail polish. A deep vampy red polish paired with black rhinestones creates a classic vampire vibe, while a pastel orange base with white ghost-shaped rhinestones leans into a more playful, trick-or-treating aesthetic. Experimenting with complementary or analogous color schemes can also lead to surprisingly striking and cohesive Halloween nail art.
Application Techniques and Adhesives for Long-Lasting Spookiness
Achieving a professional and long-lasting Halloween nail art look with rhinestones hinges on proper application techniques and the right adhesives. Simply dabbing a bit of regular nail polish onto the nail and placing a rhinestone is often not enough to keep them securely in place, especially with the wear and tear of daily activities. Investing in a dedicated nail glue or a strong gel adhesive is paramount for ensuring your spooky adornments stay put throughout the holiday season.
For gel manicures, UV or LED curing is essential for bonding rhinestones with gel adhesive. Apply a small bead of gel adhesive to your desired placement on the nail, then carefully position the rhinestone using tweezers or a wax-tipped pencil. Once placed, cure the nail under your lamp to solidify the bond. For traditional polish, a strong nail glue is the go-to. Apply a tiny dot of glue where you want the rhinestone, then press the stone firmly into the adhesive.
To further secure your rhinestones and add a protective top coat, consider applying a clear top coat around, but not directly over, the rhinestones. This helps seal the edges and prevent them from catching on things. Alternatively, for gel users, a top coat applied strategically can also help reinforce the rhinestones. Practice makes perfect, so don’t be discouraged if your first few attempts aren’t flawless. Experimenting with different application tools and adhesives will help you find what works best for your skill level and desired durability.
Themed Inspiration and Design Ideas for a Frightfully Chic Manicure
When embarking on your Halloween nail art journey, drawing inspiration from the season’s rich thematic elements can unlock a world of creative possibilities. Think beyond just pumpkins and ghosts; consider the creepy crawlies that inhabit haunted houses, the mystical creatures of folklore, or the iconic characters from horror films. Spiders and their intricate webs can be beautifully translated using black rhinestones and delicate lines of nail polish or fine glitter.
For a more sophisticated Halloween aesthetic, explore celestial themes with star-shaped rhinestones in silver or gold, paired with deep blues and purples to mimic a starry night sky. Witchcraft and spellcasting offer a wealth of inspiration, from potion bottles adorned with glittering accents to crescent moons and mystical symbols crafted with various rhinestone shapes and colors. Even classic horror movie tropes, like blood splatter or a subtle cobweb detail, can be elegantly incorporated with the right placement of colored rhinestones.
Don’t underestimate the power of negative space in your designs. Allowing some of your natural nail or base polish to show through can make your rhinestone accents pop even more. Consider a minimalist approach with a few strategically placed rhinestones on an otherwise clean nail, or go all out with a full-coverage, dazzling masterpiece. The key is to have fun and let your imagination run wild – after all, Halloween is the perfect time to embrace your inner artist and create a truly unique and spooktacular manicure.
Your Ultimate Guide to the Best Halloween Nail Art Rhinestones
Hey there, fellow nail art enthusiasts! Is it just me, or does the spooky season have you itching to deck out your nails in all things creepy and cool? Halloween is the perfect time to let your creativity run wild, and what better way to add that extra sparkle and fright than with some amazing nail art rhinestones? But with so many options out there, how do you choose the absolute best halloween nail art rhinestones to bring your ghoulish visions to life? Don’t worry, your nail art bestie is here to help! I’ve put together this super handy guide to walk you through everything you need to know to pick the perfect bling for your Halloween mani.
1. Size Really Does Matter (For Rhinestones!)
Okay, so when we’re talking about rhinestones, size is way more important than you might think. Imagine trying to create a tiny spiderweb with giant rhinestones – it just won’t work, right? On the flip side, if you’re aiming for a bold, statement-making look, super tiny specks might get lost. It’s all about matching the size of your rhinestones to the scale of your design and the overall effect you want to achieve.
Think about it like this: for intricate details, like tiny bats, little pumpkins, or delicate ghost faces, you’ll want to opt for smaller rhinestones, often in the 1-3mm range. These little guys are perfect for fine-tuning your designs and adding that subtle, yet impactful, detail. On the other hand, if you’re going for a more dramatic, eye-catching look, like a constellation of spooky stars or a bedazzled coffin nail, larger rhinestones (5mm and up) will really make your nails pop and ensure your Halloween spirit is seen from across the room!
2. Shape Up Your Spooky Style
Beyond just size, the shapes of your rhinestones can completely transform your Halloween nail art. Sure, round crystals are classic and versatile, but for a themed manicure, think outside the box! Halloween is all about the creepy crawlies, the haunted house vibes, and the general atmosphere of fright, so why wouldn’t your rhinestones reflect that?
There are so many amazing shapes available that are practically screaming Halloween! You can find little rhinestones shaped like skulls, bats, ghosts, spiders, eyeballs, and even tiny cauldrons. These pre-formed shapes make it so much easier to create recognizable Halloween motifs without having to painstakingly place multiple tiny rhinestones. Imagine a whole nail covered in tiny black bat-shaped rhinestones – instant Halloween perfection! Or a cluster of spooky eyeball rhinestones peering out from your cuticle. The possibilities are truly endless, and embracing these themed shapes will elevate your best halloween nail art rhinestones game.
3. Color Me Spooky: The Palette of the Eerie
When it comes to Halloween nail art, color is king (or queen of the night!). You want your rhinestones to complement your base polish and your chosen spooky motifs. While classic black, orange, and purple are absolute staples for Halloween, don’t be afraid to venture into other creepy colors. Think deep emerald greens for witchy vibes, blood reds for a vampy look, or even icy blues and silvers for a frosty, spectral feel.
Consider the specific theme you’re going for. If you’re creating a haunted forest scene, you might want a mix of deep greens, browns, and maybe some shimmering silvers for moonlight. For a Frankenstein-inspired nail, think vibrant greens and maybe some metallic black accents. Don’t forget the power of iridescent and holographic finishes too! These can add a magical, otherworldly shimmer that’s perfect for ghosts, potions, or even just a general eerie glow. Having a good variety of colors in your rhinestone collection will give you the flexibility to truly bring any Halloween concept to life.
4. Material Magic: What Are They Made Of?
The material of your rhinestones can significantly impact their sparkle, durability, and even how they feel on your nails. Most nail art rhinestones are made from acrylic or glass. Acrylic rhinestones are generally lighter and more affordable, making them a fantastic option for experimenting with different designs and for everyday wear. They still offer a decent amount of sparkle and come in a vast array of colors and shapes.
However, if you’re looking for that extra je ne sais quoi, that intense, eye-catching sparkle that really screams high quality, then glass rhinestones are often your best bet. Glass rhinestones tend to be heavier and have a more faceted cut, which allows them to reflect light more brilliantly. They have a beautiful, diamond-like shine that can truly elevate your best halloween nail art rhinestones. Just be mindful that glass rhinestones can be a bit more delicate and might require a slightly more secure application method to ensure they stay put.
5. Adhesive & Application: Getting Them to Stick!
Let’s be real, the most stunning rhinestone design in the world is useless if it falls off after an hour! The way you plan to apply your rhinestones is a crucial factor to consider when you’re shopping. Some rhinestones come with a pre-applied adhesive backing, which can be super convenient for quick application. These are great for simpler designs or if you’re new to rhinestone application.
However, for more intricate and long-lasting Halloween nail art, you’ll likely want to use a dedicated nail glue or a strong top coat. Many of the best halloween nail art rhinestones are designed to be applied with these adhesives. Look for rhinestones that have a flat back, as these tend to adhere better to the nail surface with glue. You might also want to invest in a good nail art brush or a wax pencil tool specifically designed for picking up and placing small embellishments. The right application method will ensure your spooky creations stay put through all your Halloween festivities!
6. Quantity and Value: Getting the Most Bang for Your Buck
When you’re diving into the world of nail art, especially for a holiday like Halloween where you might want to try out several different looks, the quantity and value of your rhinestone packs are definitely worth considering. It can be tempting to grab the cheapest option, but sometimes a slightly higher initial investment can be more cost-effective in the long run.
Think about how many nails you plan to decorate and the complexity of your designs. If you’re creating a full nail coverage look, you’ll need a substantial number of rhinestones. Buying in bulk or in larger mixed packs can often offer better value per stone. Also, consider buying multi-packs that include a variety of colors and shapes. This gives you more creative freedom without having to purchase multiple individual packs. Ultimately, you want to find a balance between getting enough rhinestones for your projects and not breaking the bank. Investing wisely in your best halloween nail art rhinestones can save you money and creative headaches down the line.
7. Durability and Longevity: Will They Last the Season?
This is a big one, especially if you’re planning on doing your Halloween nails a week or two before the big day and want them to still look fabulous. The durability of rhinestones can vary quite a bit depending on the material, the quality of the finish, and how well they are applied. Cheaper, unbranded rhinestones might lose their shine quickly or even chip.
For the best halloween nail art rhinestones that will stand the test of time (or at least the entire Halloween season!), look for rhinestones from reputable nail art brands. These often have a more robust coating that resists chipping and fading. Reading reviews from other nail art enthusiasts can also give you a good idea of how well certain rhinestones hold up. And, of course, as we’ve discussed, proper application with a good adhesive and sealing with a durable top coat are key to ensuring your spooky sparkle lasts from the first haunted house visit to the last trick-or-treater!
FAQ
What kind of rhinestones are best for Halloween nail art?
For spooky season, you’ll want to reach for a variety of shapes and sizes! Think classic round rhinestones in black, orange, purple, and green for that quintessential Halloween vibe. But don’t stop there! Crystal AB finishes can mimic a creepy iridescent glow, while darker, smoky quartz or jet black stones add a touch of gothic elegance. Consider faceted gems that catch the light for a dramatic effect, or even tiny skull or bat-shaped charms for a more playful and thematic touch.
The key is to have a good mix to create depth and interest in your designs. You might use larger stones as focal points, like a glittering spider’s body, and then fill in with smaller ones to create intricate patterns or borders. Having a selection of both shiny and more muted stones can also help your Halloween nail art pop, allowing you to create contrasting textures and visual appeal.
Are there special glues or adhesives needed for Halloween nail art rhinestones?
You’re in luck! While regular nail glue can work for many applications, investing in a good quality nail art glue specifically designed for rhinestones and embellishments will make a huge difference. These glues are typically formulated to be stronger and longer-lasting, ensuring your spooky creations stay put through all your Halloween festivities. Look for options that are clear-drying so they don’t detract from your beautiful designs, and perhaps even a gel-like consistency for extra staying power.
If you’re aiming for more elaborate 3D designs or very chunky embellishments, a builder gel or acrylic might be your best bet for securing them. You can embed the rhinestones directly into a layer of wet gel or acrylic before curing, which provides an incredibly strong hold. For a simpler approach, a good top coat can also help seal smaller, flatter rhinestones in place, but be sure to apply it carefully around the edges to avoid a messy finish.
How do I prevent my Halloween nail art rhinestones from falling off?
The secret to long-lasting Halloween nail art is all in the prep and application! Start with clean, dry nails. Make sure to remove any oils or old polish thoroughly. When applying your rhinestones, use your chosen adhesive sparingly but effectively. Dab a small bead of nail glue where you want the rhinestone to sit, and then gently press the stone into the glue with a wax pencil or tweezers.
Once your rhinestones are in place, a top coat is your best friend. Carefully apply a thin layer of a good quality top coat, making sure to cap the free edge of your nail. For extra security, you can even apply a tiny bit of top coat around the base of each rhinestone, being careful not to let it flood and dull the sparkle. This extra step can significantly improve the longevity of your haunted manicure.
What are the easiest Halloween nail art rhinestones for beginners?
If you’re just starting out with Halloween nail art, don’t feel intimidated! There are plenty of beginner-friendly options that will give you a fantastic spooky effect with minimal fuss. Flat-back rhinestones in classic Halloween colors like orange, black, and purple are a great choice. They lie relatively flat against the nail and are easy to pick up and place with a wax pencil or even a slightly damp orangewood stick.
Another super simple option is to look for pre-made nail art stickers that incorporate rhinestones. These can be applied directly to your nail polish or gel and often have adhesive already on them. You can also find nail art wheels or kits that have a variety of shapes and sizes already sorted, making it easier to grab what you need without rummaging. Think of simple ghost eyes made from two small white rhinestones, or a tiny orange rhinestone cluster for a jack-o’-lantern effect!
Can I reuse Halloween nail art rhinestones?
That’s a great question! In most cases, it’s tricky to perfectly reuse rhinestones once they’ve been glued onto your nails. When you try to remove them, you often end up with residual glue, or the stones themselves can get chipped or scratched. If you’re trying to salvage them, you might be able to gently scrape off the old glue with a nail file or soak them in acetone (though this can dull their shine).
However, if you’re very careful and gentle during removal, you might be able to reuse some of them for less intricate designs or on craft projects. For truly pristine reuse, it’s generally best to consider them a single-use item for your nails. Think of them as special occasion embellishments that, while beautiful, are best replaced with fresh ones for your next spooky manicure to ensure a flawless finish.
How do I clean my nails after using Halloween nail art rhinestones?
After enjoying your dazzling Halloween nail art, you’ll want to clean up properly. If you’ve used regular nail polish, a standard nail polish remover will do the trick. However, be mindful that the rhinestones might catch on the cotton ball or pad, so try to gently wipe around them as much as possible, or use a nail polish remover pen for precision. For any stubborn adhesive residue left behind, a bit of cuticle oil applied around the stone before wiping can help loosen it.
If you’ve used gel polish and adhered your rhinestones with gel, you’ll likely need to file away the top layer of gel and the rhinestones to remove them. This process might take a bit of patience, and you’ll want to be careful not to file down to your natural nail. Once the bulk of the embellishments are gone, you can then proceed with your usual gel polish removal process, and follow up with a good hand and cuticle moisturizing treatment to rehydrate your nails.
Where can I buy the best Halloween nail art rhinestones?
You’ve got a treasure trove of options when it comes to snagging the best Halloween nail art rhinestones! Your local beauty supply stores are often fantastic places to browse, as they usually carry a wide selection of nail art supplies, including seasonal items. Online retailers like Amazon, Etsy, and dedicated beauty supply websites are also your best bet. These platforms offer an incredible variety of shapes, colors, and finishes, often at competitive prices.
When shopping online, definitely take a peek at customer reviews and photos to get a better sense of the quality and sparkle of the rhinestones. You might find unique, handcrafted embellishments on Etsy that will truly set your Halloween nails apart. Don’t forget to check out specialized nail art supply websites too, as they often have the latest trends and the most extensive collections for all your festive nail endeavors.
Final Words
So, you’ve got the inside scoop on how to transform your fingertips into spooky-chic masterpieces! Armed with the knowledge of the best Halloween nail art rhinestones, you’re ready to ditch the plain polish and dive headfirst into a world of dazzling designs. Think cobwebs that actually shimmer, pumpkins with an extra pop, or maybe even a constellation of tiny ghosts twinkling on your nails. The possibilities are as endless as your imagination, and we’re here to tell you that you’ve got this! Don’t be afraid to experiment, to play with different placements, and to let your creativity shine.
It’s time to gather your shimmering supplies and get ready to unleash your inner nail art artist this Halloween. Remember, the right sparkle can elevate any look from ordinary to absolutely show-stopping, and with the tips and reviews we’ve shared, you’re well on your way to finding those perfect, shimmering accents. Go forth, experiment, and create a Halloween manicure that truly reflects your unique style and spooky spirit. You’re about to have the most dazzling nails on the block, so let the creative chaos begin!