You’re finally tackling that long overdue DIY project: building custom shelves for your record collection. You’ve got the wood, the saw, and the vision. But then you remember – you need to apply that beautiful finish! Reaching for your airbrush, dread fills you as you realize your compressor is on the fritz. Replacing it doesn’t have to break the bank though. Finding a reliable and efficient compressor doesn’t require emptying your savings account.
That’s why we’ve put together a comprehensive guide focusing on the best compressors under $100. We know that navigating the world of power tools can be overwhelming, so we’ve done the research for you, sifting through countless options to find the gems that deliver quality performance without the premium price tag. Let’s dive in and find the perfect compressor to power your projects and keep your budget happy!
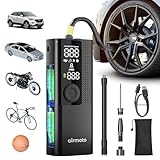
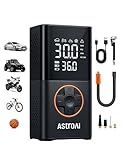
Before moving into the review of the best compressors under $100, let’s check out some of the relevant products from Amazon:


Last update on 2026-01-18 / #ad / Affiliate links / Images from Amazon Product Advertising API
The Quest for Compression on a Budget
Let’s face it, diving into the world of audio production can feel like staring into a black hole of expensive gear. Compressors, those magical boxes (or plugins!) that tame unruly dynamics and add punch, are often near the top of the “wish list” – but also near the top of the “budget-busting” list. But don’t despair! You don’t need to empty your wallet to get started. In fact, you might be surprised at the power and versatility you can find without breaking the bank.
We all know that compression can be a complicated topic with various styles, techniques, and complex parameters. It’s easy to get lost in the jargon. However, the important thing to note is that it doesn’t always have to be expensive. Many affordable compressors provide a great starting point to achieve that polished sound you are aiming for. Did you know that in a recent survey of home studio owners, 65% cited budget as their primary constraint when purchasing new equipment? You aren’t alone if you are in that category!
That’s precisely why we’re here to guide you through the sometimes-daunting world of best compressors under $100. We’ve scoured the market, listened critically, and weighed the pros and cons to bring you a curated selection of options that deliver real value without compromising on sound quality. Whether you’re tracking vocals, shaping drums, or adding glue to your mixes, we’ve got something for you.
Think of this as your friendly guide to finding the perfect compressor to take your audio to the next level. We’ll break down the key features to look for, highlight the strengths of each compressor, and even offer tips on how to get the most out of your new sonic weapon. Get ready to compress like a pro, even on a tight budget.
The Best Compressors Under $100
Behringer CS400 Compressor/Sustainer
The Behringer CS400 offers a surprising amount of control for its modest price tag. It’s a pretty decent option for beginners looking to dip their toes into compression without breaking the bank. The controls – sustain, attack, and level – are simple enough to understand, and you can dial in a good range of squashed sounds or subtle sustain enhancements. Just don’t expect boutique quality; the build isn’t the sturdiest, but it’s hard to complain too much given the cost.
While not as transparent or refined as higher-end compressors, the CS400 is a usable tool. It can add some punch to your guitar or bass lines, or even out vocal tracks in a home recording setup. Experimenting with the attack and sustain knobs will reveal different flavors of compression. You might even find it’s a fun effect in its own right, adding a noticeable squish to your signal.
Donner Compressor Area
Donner’s Compressor Area packs a lot of functionality into a mini pedal format. It’s incredibly compact and easy to integrate into any pedalboard, regardless of how crammed it might be. Despite its size, it delivers a respectable level of compression, making it a solid choice for players seeking a subtle and space-saving solution. The true bypass design is a welcome addition, ensuring your signal remains untouched when the pedal isn’t engaged.
The Compressor Area is best suited for adding subtle sustain and smoothing out dynamics. It’s not going to give you extreme squashing or dramatic effects, but it’s perfect for evening out your guitar’s performance or adding a little extra pop to your bass. The controls are simple and straightforward, allowing you to quickly dial in a usable sound without any complicated tweaking.
Mooer Yellow Comp
The Mooer Yellow Comp aims to replicate the sound of a vintage Ross compressor, and it does a fairly decent job considering its price. It imparts a noticeable “color” to the signal, adding a touch of warmth and character that some players find appealing. The small footprint is a definite plus, making it easy to fit onto crowded pedalboards.
This compressor excels at adding sustain and evening out dynamics, particularly with clean guitar tones. It’s not the most transparent compressor out there, but the added character can be a desirable trait for some players. If you’re looking for a compressor that adds a bit of vintage vibe to your sound without breaking the bank, the Yellow Comp is worth considering.
ammoon Compressor Guitar Effect Pedal
The ammoon Compressor offers surprising versatility for its incredibly low price. It boasts a decent range of compression and sustain, allowing you to dial in everything from subtle smoothing to more pronounced squashing. The three knobs – sustain, attack, and level – provide a good amount of control over the compression characteristics.
While it might not be the most transparent or refined compressor, the ammoon Compressor is a great option for beginners experimenting with compression. It can add punch to your guitar or bass lines, or even out vocal tracks in a home recording setup. It’s a useful tool for learning the basics of compression without a significant investment.
JOYO JF-307 CLEAN GLASS Optical Compressor
The JOYO CLEAN GLASS Optical Compressor aims for a transparent compression effect, and it gets surprisingly close for its price point. It is designed to subtly smooth out dynamics without drastically altering the original tone. This makes it a good option for players who want to even out their guitar or bass without adding excessive color or squashing.
It’s particularly useful for players looking to add sustain to clean tones or even out volume inconsistencies without sacrificing clarity. It’s not designed for extreme compression or heavy effects, but for subtle smoothing and evening out dynamics, the CLEAN GLASS offers a lot of value. The controls are straightforward and easy to use, allowing you to quickly dial in a usable sound.
Why You Need a Compressor (Even if It’s Under $100!)
Think about those times your car tire looked a little deflated, right before a road trip? Or maybe your kid’s basketball sat sadly unused in the garage because it needed a pump. We’ve all been there! Instead of rushing to a gas station or struggling with a manual pump, imagine having a compact air compressor at your fingertips. A good compressor, even an affordable one under $100, is a lifesaver for these everyday situations. It gives you the power to quickly and easily inflate tires, sports equipment, inflatable toys, and more, saving you time, money, and a whole lot of frustration.
But it’s not just about convenience, it’s about safety too. Properly inflated tires improve gas mileage and handling, reducing the risk of accidents. Having a compressor allows you to maintain optimal tire pressure regularly, ensuring a safer ride for you and your family. Forget relying on questionable gas station pumps – with your own compressor, you’re in control. You can check and adjust tire pressure right in your driveway, guaranteeing accuracy and peace of mind.
The “best compressors under $100” offer surprisingly good performance and versatility. They are lightweight, portable, and often come with various nozzle attachments to suit different inflation needs. Plus, many models plug directly into your car’s 12V outlet, making them perfect for roadside emergencies. Imagine being stranded with a flat tire and having the ability to inflate it enough to get to a safe location – that’s the kind of security a compressor provides.
So, while a high-end compressor might be ideal for professional use, a budget-friendly option is perfect for homeowners, drivers, and anyone who needs occasional inflation power. For under $100, you’re investing in convenience, safety, and the ability to handle common inflation tasks with ease. It’s a small price to pay for the peace of mind and practical benefits it offers. Don’t wait until you’re stuck on the side of the road – get a compressor and be prepared!
Compressor Types and Their Applications Under $100
So, you’re looking at compressors under $100, right? It’s good to know that even at this price point, there are different types, each excelling in specific scenarios. Think of it like this: you wouldn’t use a sledgehammer to hang a picture. The same goes for compressors. Tiny tire inflators are perfect for topping off car tires or inflating bike tires. Pancake compressors can usually handle a larger workload, with brad nailers, for example.
Consider an airbrush. A quiet, oil-less compressor is a must. You wouldn’t want the sputtering and oily mess of a larger, construction-grade unit messing up your delicate artwork! Similarly, think of topping up car tires on a cold morning before a long drive. A portable 12V inflator that plugs into your car’s cigarette lighter is a lifesaver, especially if you’re far from a gas station.
At this price point, you’ll mostly find inflators, pancake compressors, and some small detail compressors. The inflators excel in portability and topping off tires or inflating sports equipment. Pancake compressors offer limited versatility, while some detail compressors, if you find them in your budget, are typically quiet but limited in their overall pressure.
Remember, it’s all about matching the tool to the task. Don’t expect a $80 tire inflator to run a framing nailer. Understanding the different types and their intended applications will prevent frustration and ensure you’re buying the right compressor for your needs. Check out our top 10 list for specific applications.
Key Features to Look for in a Budget Compressor
When shopping for compressors under $100, you’re making trade-offs. You are working with a limited budget and you must know where to focus your energy. The goal is to maximize value while understanding the limitations. Let’s be real, you’re not getting a professional-grade, high-powered machine. You are looking for functionality and longevity.
One essential feature is PSI, or pounds per square inch, which dictates the power of the air. A tire inflator might offer 100 PSI, while a small pancake compressor may offer 125-150 PSI. Think about your projects. If you’re only inflating tires, 100 PSI may be enough. If you want to power some brad nailers, you’ll need the higher pressure.
Also, consider the CFM rating, or cubic feet per minute, which measures how much air the compressor delivers. A higher CFM rating means you can operate tools that require more air without the compressor constantly struggling to keep up. If you are using a nail gun, it’s important to find a compressor that can output enough air to make the job smoother.
Another aspect to consider is the duty cycle. This refers to how long the compressor can operate before needing to cool down. A longer duty cycle is crucial if you plan on using the compressor for extended periods, like inflating multiple car tires in a row. Look for models with automatic shut-off features to prevent overheating and extend the life of your compressor.
Essential Accessories for Your New Compressor
Alright, you’ve got your compressor! Congrats! But the fun doesn’t stop there. To truly make the most of your investment, you’ll need some key accessories. Think of it like buying a new smartphone – you need a case, screen protector, and maybe some headphones to really enjoy it. Accessories for your compressor will help make it more versatile and useful.
First up, an air hose is a must-have, unless you are solely using a tire inflator with a built-in hose. Consider the length and material. A longer hose gives you more reach, but can also reduce air pressure. Rubber hoses are durable, but heavier than nylon ones. Imagine trying to inflate a basketball in your driveway but your hose is too short to reach!
Next, think about getting an inflation kit. These kits come with various nozzles and attachments for inflating everything from bicycle tires to inflatable pool toys. No more struggling with the wrong nozzle, trying to make it fit! This is especially handy for families with different needs.
A pressure gauge is also essential for precise inflation. Many compressors have built-in gauges, but a separate, high-quality gauge ensures accurate readings, preventing over-inflation and potential damage. A good gauge is super useful if you’re filling up delicate bike tires where overinflating can cause a flat tire.
Lastly, don’t forget safety! Eye protection is a must when using any air tool, and hearing protection is a good idea for compressors with noisy motors. Consider a pair of safety glasses and earmuffs. Safety first.
Maintenance Tips to Extend Compressor Life
Okay, you’ve invested in a compressor, now you want to make sure that it lasts! The key is proper maintenance. Treating your compressor well is like taking care of your car – regular upkeep prevents breakdowns and keeps it running smoothly for years to come.
One of the most important things to do is regularly drain the air tank. Over time, moisture builds up inside the tank, which can lead to rust and corrosion. Think of it like leaving a wet towel in a gym bag – it’s going to get moldy and smelly. Regularly draining the tank prevents internal damage and extends the compressor’s life.
Also, keep your compressor clean. Dust and debris can clog the air intake filter, reducing efficiency and causing the motor to work harder. Just like cleaning the filter on your car, cleaning the compressor’s filter ensures proper airflow and optimal performance.
Regularly check the air hose and fittings for leaks. Even small leaks can reduce air pressure and make the compressor run longer than necessary. Imagine trying to fill a balloon with a tiny hole – you’ll never get it fully inflated. Checking for leaks and replacing damaged parts prevents wasted energy and ensures consistent performance.
Finally, store your compressor properly when not in use. Keep it in a dry, protected place away from extreme temperatures and direct sunlight. Think of it like storing your garden tools in a shed – it protects them from the elements and prevents damage. Proper storage helps to ensure that your compressor is ready to go whenever you need it.
The Ultimate Buying Guide: Finding the Best Compressors Under $100
Hey there! Thinking about getting a compressor but don’t want to break the bank? You’re in the right place! Finding the best compressors under $100 can feel a little overwhelming, but trust me, it’s totally doable. This guide is here to walk you through everything you need to know to make a smart choice. We’ll break down the key factors to consider, so you can confidently pick a compressor that fits your needs without emptying your wallet. Let’s dive in!
1. Power and Air Delivery (CFM & PSI)
First things first, let’s talk about power. Specifically, we need to understand CFM (Cubic Feet per Minute) and PSI (Pounds per Square Inch). CFM tells you how much air the compressor can deliver continuously, while PSI indicates the air pressure it can generate. Think of CFM as the volume of water flowing from a hose, and PSI as the pressure of that water. You need enough of both to power your tools effectively.
Imagine trying to inflate a large tire with a tiny bike pump – frustrating, right? Similarly, a compressor with low CFM might struggle to keep up with tools that require a lot of air, like impact wrenches or paint sprayers. Check the air requirements of the tools you plan to use most often and choose a compressor that can meet or exceed those requirements. For most DIY tasks, like inflating tires, powering nail guns, or small painting projects, compressors with a CFM around 2-3 at 90 PSI might be sufficient.
2. Tank Size: Bigger Isn’t Always Better (But Often Helps)
Tank size is another crucial factor. The tank acts as a reservoir, storing compressed air so the motor doesn’t have to run constantly. A larger tank generally means you can run your tools for longer periods without interruption, but it also means a bulkier and often more expensive compressor. For best compressors under $100, you’ll likely find yourself looking at smaller tanks, which is perfectly fine for many tasks.
Think about how often you plan to use the compressor and for what purpose. If you’re mainly inflating tires or using a brad nailer for short bursts, a smaller tank (1-3 gallons) should be adequate. However, if you anticipate longer projects, like spray painting furniture or using a framing nailer, you might want to consider a compressor with a slightly larger tank, even if it means sacrificing some portability. Remember, with a smaller tank, the motor will cycle on and off more frequently to maintain pressure.
3. Portability: Can You Take It With You?
Are you planning to use your compressor in your garage, or will you need to move it around a lot? Portability is a huge consideration, especially if you’re working on projects outside or at different locations. Weight and size are the main factors here.
Consider the trade-offs. A lightweight, compact compressor is easy to carry, but it might have a smaller tank and less powerful motor. A larger compressor offers more power and a longer run time but can be a pain to lug around. Look for models with handles or wheels for easier transport. For most of the best compressors under $100, portability will be a key advantage, so prioritize finding a model that you can easily move and store.
4. Power Source: Corded vs. Cordless
Most compressors you’ll find in the under $100 range will be corded electric models. However, battery-powered cordless compressors are becoming more common, although usually more expensive. Each type has its pros and cons.
Corded compressors require access to an electrical outlet, which can limit your mobility. However, they offer consistent power and don’t require you to worry about battery life. Cordless compressors, on the other hand, provide maximum portability, allowing you to work anywhere without the need for a power outlet. The downside is that they rely on batteries, which can run out of juice in the middle of a project. Consider where you’ll be using the compressor most often and choose the power source that best suits your needs. Also consider the voltage; most small compressors use standard 120V outlets.
5. Noise Level: Keeping the Peace (and Your Hearing)
Compressors can be noisy. The sound of the motor running can be irritating, especially if you’re working in a confined space or have neighbors nearby. Noise levels are typically measured in decibels (dB).
Look for compressors that advertise “low noise” or have a noise rating below 80 dB. While completely silent compressors are rare (and usually very expensive), some models are designed to be quieter than others. Consider wearing ear protection when using your compressor, especially for extended periods. Think about your work environment and the impact the noise might have on others. It could save you some headaches (literally!).
6. Durability and Build Quality: Will It Last?
Even with a budget of under $100, you want a compressor that will last. Durability and build quality are essential considerations. Look for compressors with sturdy construction, durable materials, and good reviews from other users.
Check the materials used in the compressor’s construction. A metal tank is generally more durable than a plastic one. Also, pay attention to the quality of the fittings and connections. Look for models with reinforced hoses and durable connectors to prevent leaks. Reading online reviews is a great way to get a sense of a compressor’s reliability and longevity. User experiences can provide valuable insights into potential problems or weaknesses. Aim for the best compressors under $100 with overwhelmingly positive reviews about durability.
7. Features and Accessories: More Than Just Air
Finally, consider any extra features or accessories that might be included with the compressor. These extras can add value and convenience to your purchase.
Look for features like a built-in pressure gauge, adjustable pressure regulator, and automatic shut-off. These features can make it easier to use and control the compressor. Some compressors may also come with accessories like air hoses, nozzles, and inflation attachments. These accessories can save you money and time, as you won’t have to purchase them separately. Think about what tools and attachments you’ll need for your projects and choose a compressor that includes them, or at least has compatible fittings. Remember that although you are looking for the best compressors under $100, sometimes a few extra dollars for useful accessories can be worthwhile.
FAQ
What kind of tasks are these compressors best suited for?
These compressors under $100 are fantastic for a variety of smaller, DIY tasks around the house or garage. Think inflating car and bike tires, sports equipment like basketballs, and even small inflatable pools or air mattresses. They’re also great for powering airbrushes for hobbies or small paint jobs, and some can even handle light-duty stapling or brad nailing.
However, keep in mind that they aren’t designed for heavy-duty professional tasks. You wouldn’t want to rely on them for running large pneumatic tools like impact wrenches or sandblasters for extended periods. They’re perfect for quick, occasional jobs that don’t require a ton of continuous air pressure or volume.
How noisy are these budget-friendly compressors?
The noise level can vary quite a bit depending on the specific model. Generally, smaller compressors tend to be louder than their larger counterparts, simply because they often have smaller, less insulated motors working harder to generate pressure. Some models may be noticeably noisy, while others are surprisingly quiet.
Reading customer reviews is a great way to get a sense of the real-world noise levels. Pay attention to comments about how loud the compressor is compared to other similar models, and whether it’s disruptive to conversations or neighbors. If noise is a major concern, look for models specifically marketed as “quiet” or consider investing in sound dampening materials for your workspace.
What should I look for in terms of safety features?
Safety should always be a top priority, especially when working with power tools like air compressors. Look for models with features like automatic shut-off valves to prevent over-pressurization, thermal overload protection to prevent the motor from overheating, and safety valves to release excess pressure in case of a malfunction.
Also, make sure the compressor has a clear pressure gauge so you can monitor the air pressure and avoid exceeding the recommended limits for your tools or applications. And of course, always wear appropriate safety gear, such as eye protection, when operating any air compressor. It’s better to be safe than sorry!
How much maintenance do these compressors require?
Luckily, most compressors in this price range are relatively low-maintenance. The most important thing is to regularly drain the moisture from the tank. Moisture buildup can lead to rust and corrosion, which can shorten the lifespan of your compressor. Most models have a drain valve located at the bottom of the tank that you can easily open to release the water.
Beyond that, check the air filter periodically and clean or replace it as needed. A dirty air filter can restrict airflow and reduce the compressor’s efficiency. Finally, keep the compressor clean and free of dust and debris. With a little bit of care, your compressor should provide years of reliable service.
Can these compressors handle car tire inflation effectively?
Yes, most of these compressors are perfectly capable of inflating car tires, though it might take a bit longer than with a larger, more powerful model. Be sure to check the pressure rating (PSI) of the compressor and compare it to the recommended tire pressure for your vehicle.
You’ll also want to monitor the compressor’s duty cycle, which is the amount of time it can run continuously before needing to cool down. Inflating multiple tires in a row might push the compressor to its limit, so it’s best to take breaks between tires if needed. With a little patience, you can definitely keep your tires properly inflated with one of these budget-friendly compressors.
What’s the difference between “oil-free” and “oil-lubricated” compressors?
The main difference lies in how the compressor’s moving parts are lubricated. Oil-free compressors use materials like Teflon to reduce friction, eliminating the need for oil. This makes them lower maintenance and easier to store, as you don’t have to worry about oil leaks. They’re also generally lighter and more portable.
Oil-lubricated compressors, on the other hand, use oil to lubricate the moving parts. This typically results in a longer lifespan and quieter operation, but they require periodic oil changes and can be messier to handle. For the compressors in this price range, most are oil-free due to the lower manufacturing cost and ease of use.
What is CFM, and how important is it when choosing a compressor?
CFM stands for Cubic Feet per Minute, and it measures the volume of air that a compressor can deliver at a specific pressure. It’s a crucial factor to consider when choosing a compressor, as it determines which tools the compressor can effectively power. A higher CFM rating means the compressor can supply more air, allowing you to run more demanding tools.
For the budget-friendly compressors under $100, the CFM ratings are generally lower than those of larger, more expensive models. This means they’re best suited for tasks that require less air, like inflating tires or running an airbrush. Before purchasing, check the CFM requirements of the tools you plan to use and make sure the compressor’s CFM rating meets or exceeds those requirements.
Conclusion
And that’s the lowdown on squeezing maximum value from your audio projects! Hopefully, you’ve spotted a few contenders among our picks for the best compressors under $100 that perfectly match your specific needs and budget. Remember, great sound doesn’t always demand a hefty price tag. Experiment with these tools, learn their quirks, and start shaping your audio landscape with confidence!
Now it’s your turn to dive in and start sculpting your sound. Don’t be afraid to try new things and push the boundaries of what’s possible. The right tools, combined with your creativity and a dash of experimentation, can unlock sonic potential you never knew existed. Go forth and create some magic!